
Measurements & Elements
TL;DR: The Measurement View is where you perform all takeoffs. Here you can draw measurement elements, adjust their properties, set scale and viewports, and track calculated quantities in real time.
Overview
When you open a Markup Page, AedisPro automatically enters the Measurement View. This workspace provides all tools needed to perform length, area, and count measurements directly on your drawings.
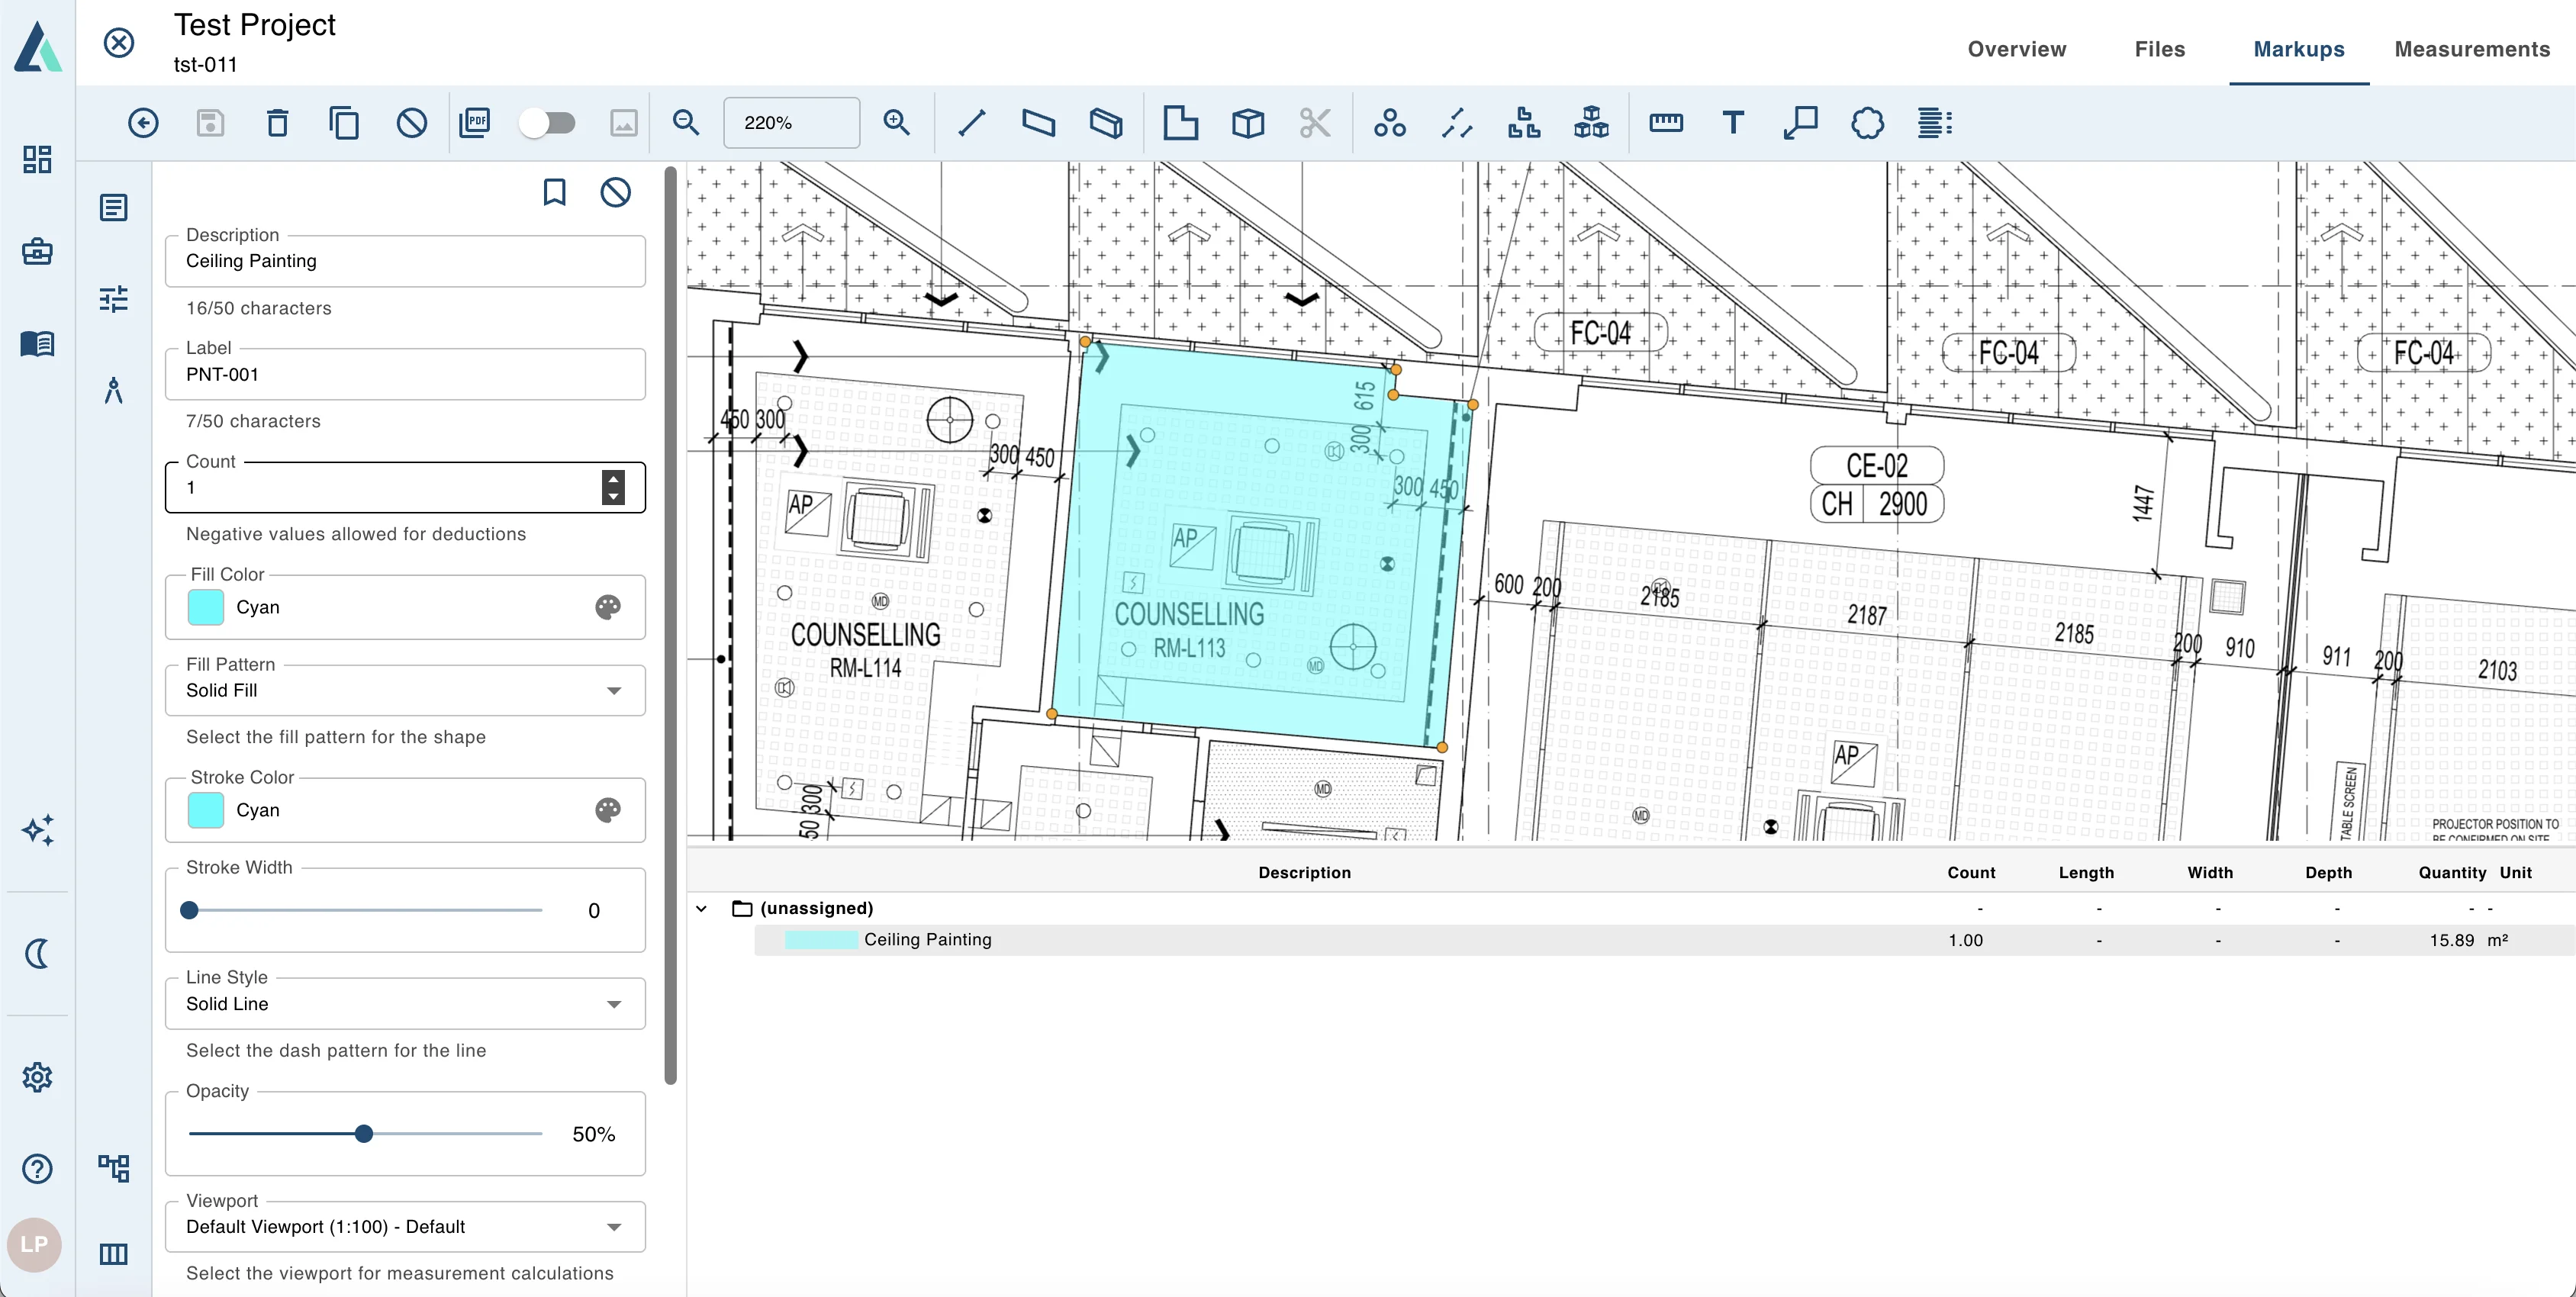
Complete Measurement View interface with drawing canvas, tools, and measurement panels
The Measurement View consists of four main components:
- Drawing Canvas – where measurements are drawn
- Element Properties Panel – edit properties of selected measurement elements
- Scale & Viewports Panel – configure scale and define multiple measurement areas
- Measurement Tree – view calculated quantities, organized by collection
These components work together to ensure accurate, structured, and efficient takeoffs.
Measurement Tools Overview
The top toolbar is organized into logical groups for efficient workflow:
Basic Controls
- Select / Move tool – select and move measurement elements
- Undo / Redo – step backward or forward through your actions
- Delete element – remove selected measurements
- Copy / Duplicate – create copies of measurements
View Controls
- PDF and Image Switch – toggle between PDF and image viewing modes
- Zoom Controls – zoom in, zoom out, fit to view, and custom zoom levels
- Pan & Rotate – navigate and orient your drawing
Length Tools
Length tools allow you to measure linear distances and convert them to area or volume quantities.
- Length – measure linear distances (walls, perimeters, runs)
- Length to Area – convert linear measurements to area (e.g., skirting boards, wall finishes)
- Length to Volume – convert linear measurements to volume (e.g., pipes, gutters)
Area & Volumes
Measure 2D surfaces and 3D quantities directly on your drawings.
- Area Tool – measure 2D surfaces (rooms, slabs, finishes)
- Volume Tool – measure 3D quantities (excavation, concrete pours)
Count Tools
Count discrete items and optionally apply length, area, or volume multipliers for complex takeoffs.
- Count – place symbols to count discrete items (doors, windows, fixtures)
- Count to Length – count items and apply a length multiplier
- Count to Area – count items and apply an area multiplier
- Count to Volume – count items and apply a volume multiplier
Annotations
Add notes, labels, and visual markers to enhance your markups and communicate details.
- Text & Labels – add notes and callouts to your markup
- Shapes & Highlights – emphasize areas or add visual markers
Each tool produces a different type of measurable element on your markup, and all measurements are automatically calculated and displayed in the Measurement Tree.
Element Properties
The Element Properties panel appears on the left and updates automatically when you select a measurement element.
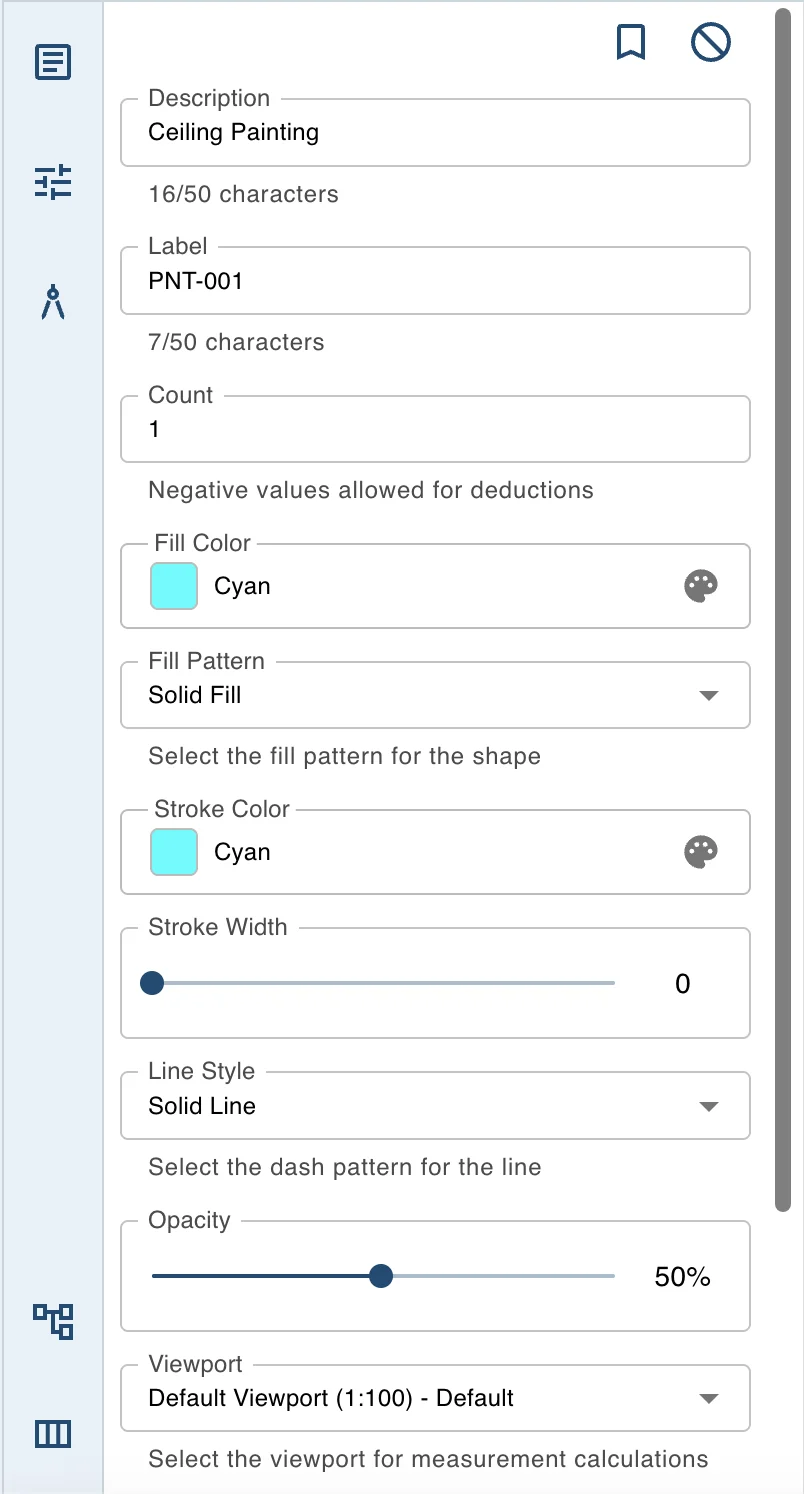
Element Properties panel for customizing measurement element attributes and appearance
You can use this panel to customize:
Description
A human-readable identifier for the measurement (e.g., room, wall length, floor finish).
Label
Displayed name used inside the Measurement Tree.
Count
Only used for count/symbol measurements. Automatically calculates when placing symbols.
Fill Color
The interior color used for area measurements. Useful to visually differentiate rooms or zones.
Stroke Color
The outline color for your shapes/lines.
Stroke Width
Thickness of the outline. Set to 0 for invisible borders or increase for clarity.
Opacity
Adjust transparency of filled shapes for better visibility of drawing lines underneath.
Collection
Assign the measurement to a collection (e.g., Floor Finishes, Rooms, External Works). This helps organize groups of measurements.
Viewport
Select which viewport (scale region) this measurement belongs to.
Tip: When working with multi-scale drawings, always ensure each measurement is assigned to the correct viewport.
Scale and Viewports
Accurate measurement requires an accurate scale.
Scale & Viewports panel for configuring measurement scales and defining scale regions
The Scale & Viewports panel lets you:
Default Scale
Shows the currently active scale, e.g. 1:100.
You can:
- Manually edit the scale
- Use the calibration tool (measuring with two points)
- Use the auto-detect tool (if available)
Once set, all measurements inherit this default scale unless assigned to a different viewport.
Viewports
Viewports allow you to define multiple scale regions within one drawing, useful when:
- A drawing contains multiple details with different scales
- Only part of the drawing needs a unique measurement context
Creating a Viewport
- Click the + button in "Other Viewports".
- Draw a boundary around the region on the drawing.
- Set a separate scale for this viewport.
- Assign measurements to this viewport using the Element Properties panel.
You can:
- Edit existing viewports
- Calibrate viewport scale
- Delete unused viewports
Best Practice: Create separate viewports for details, insets, and enlarged views to maintain accurate quantities.
Measurement Tree
The Measurement Tree displays all measured elements in a structured, collapsible format.
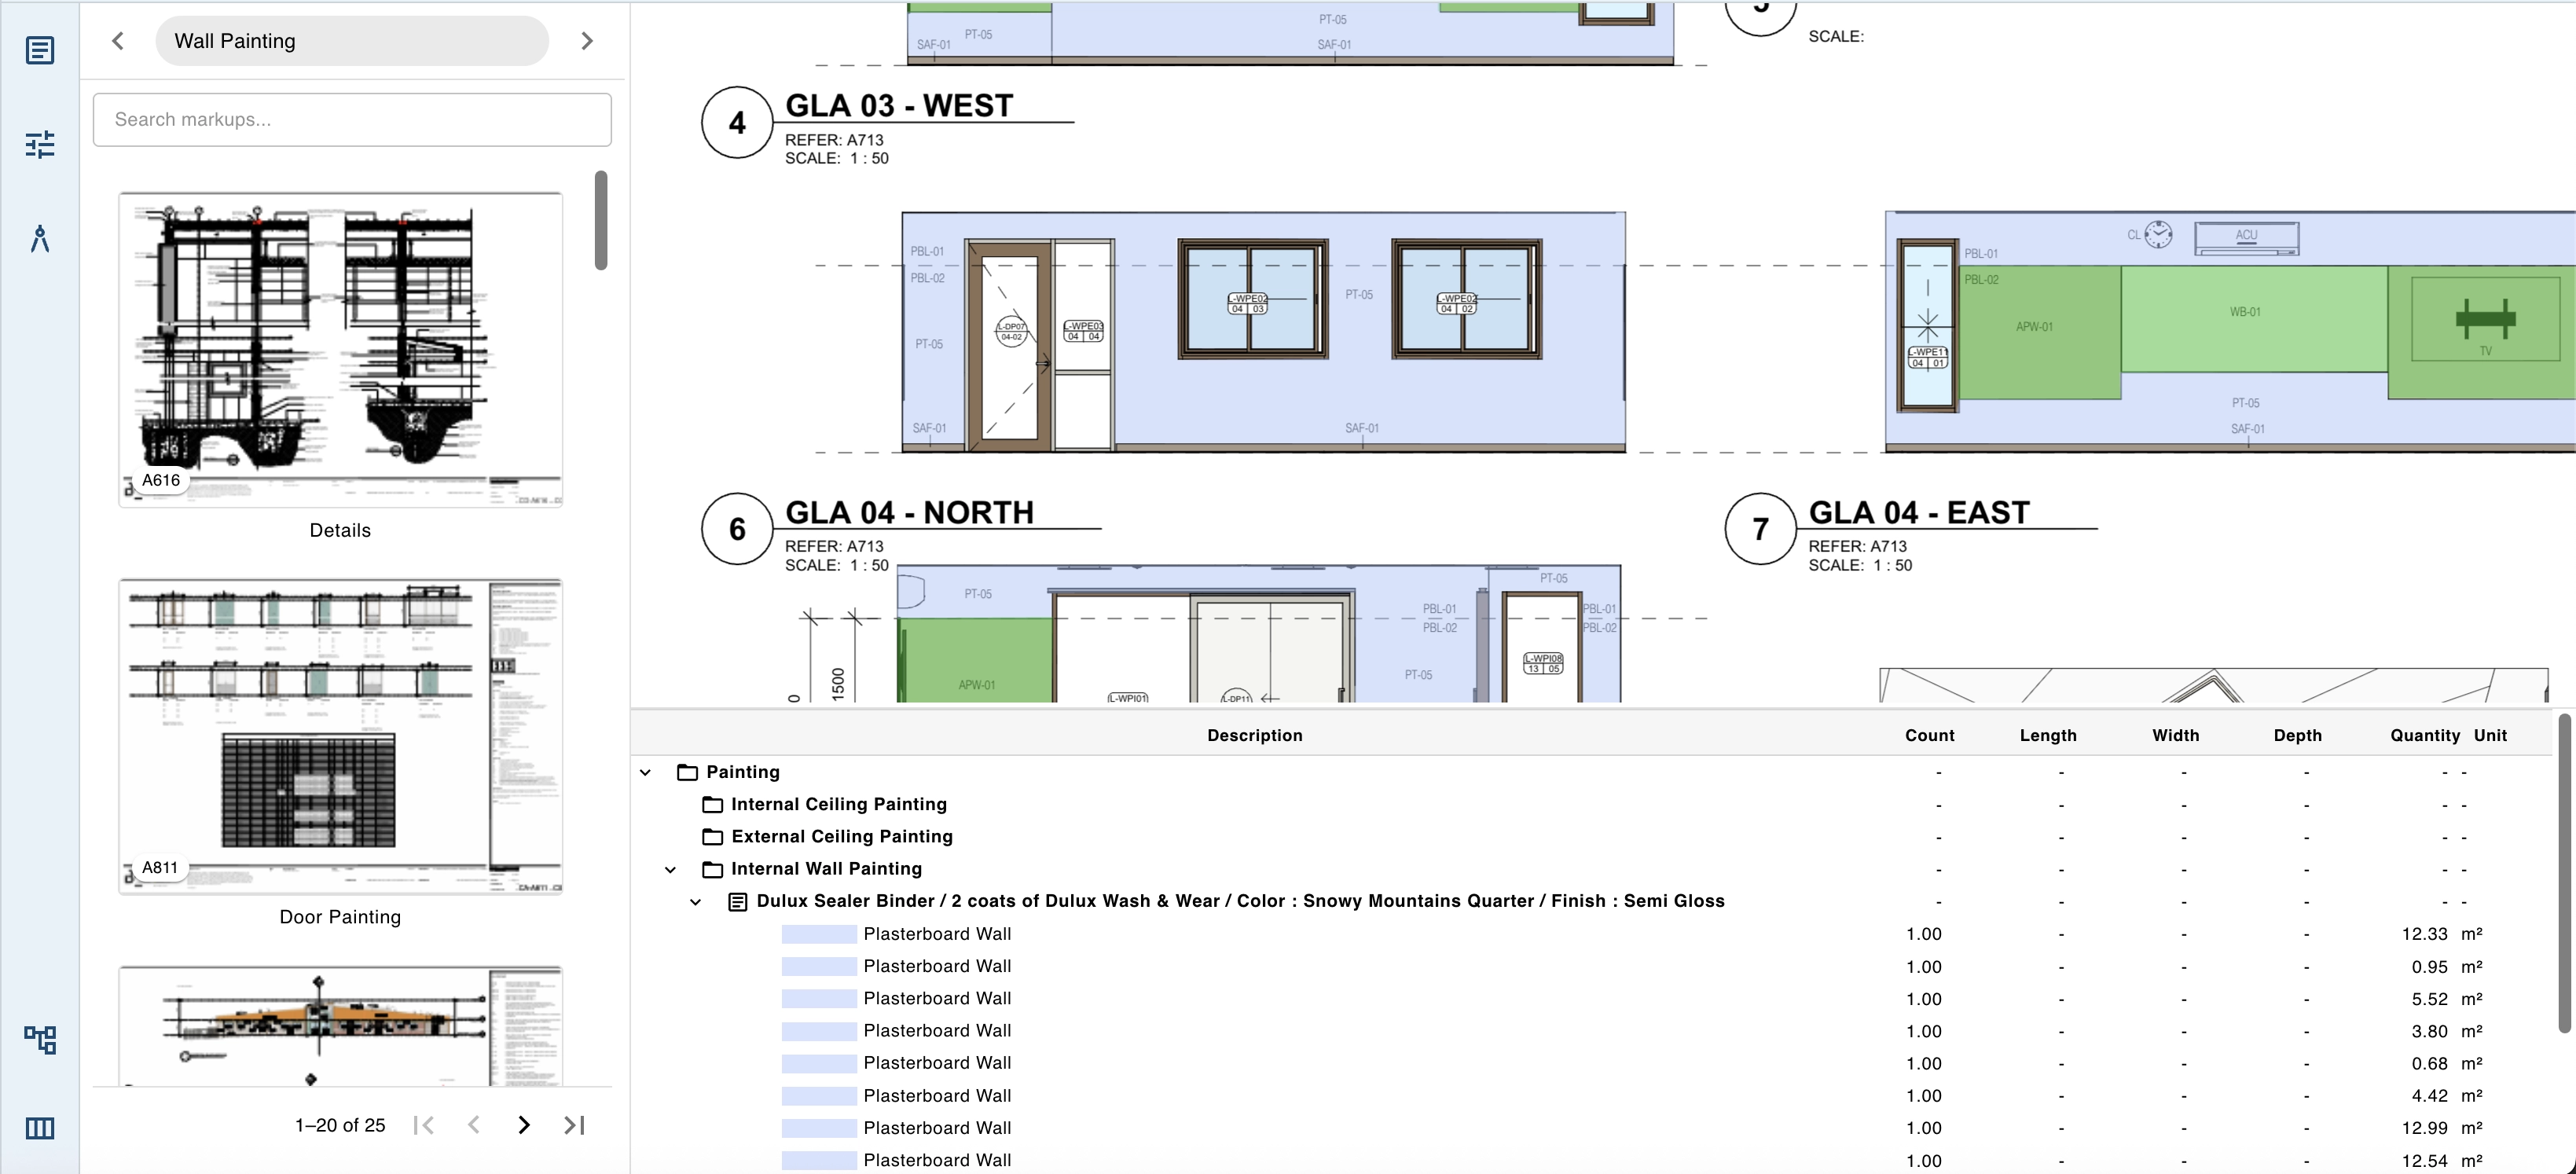
Measurement Tree displaying calculated quantities organized by collections
Each entry shows:
- Description
- Quantity
- Unit (m², m, count, etc.)
Measurements are grouped by Collections. If no collection is assigned, elements appear under (unassigned).
Why the Measurement Tree is Important
- It provides a live summary of all calculated measurements
- Helps verify completeness before exporting
- Allows quick navigation to measurement elements
- Organizes your takeoff logically for pricing, exporting, or reporting
Clicking any item will highlight the measurement on the drawing.
Performing a Measurement
Step-by-Step Process
1. Choose a tool
Select Area, Length, or Count from the top toolbar.
2. Draw on the canvas
Click around the shape or along the line to define your measurement.
3. Adjust Element Properties
Change color, width, labels, or collection for clarity and organization.
4. Ensure correct scale/viewport
Assign measurement to the correct viewport if needed.
5. Review in Measurement Tree
Verify the measurement quantity and unit.
Summary
The Measurement View is where all your takeoff work happens. Using the provided tools and panels, you can:
- ✓ Draw precise measurements
- ✓ Adjust visual and structural properties
- ✓ Maintain consistent scales with viewports
- ✓ Track all quantities using the Measurement Tree
This ensures a clear, accurate, and audit-friendly measurement workflow suitable for professional estimating and quantity surveying.